Handmade baby gifts

We're so fortunate to have such generous friends. Since we've announced our baby-on-the-way, our friends and family have been offering their used items (we're ALL about the hand-me-downs!), showering us with amazing gifts, contributing to our reusable diaper fund, and taking the time to give us invaluable advice. Thanks everyone!


I'm especially impressed by our friends who have taken the time to make a gift by hand. I know how time consuming it is to hand-make gifts, so the least I could do is highlight the talent in a blog post!

Our friend Ange used to live with us, and when her friend was expecting a baby girl last year I saw her spend countless nights in front of the tv crocheting a beautiful blanket for the baby. I was thrilled to receive a crocheted blanket of my own, in beautiful shades of raspberry and pale pink.


Our Ottawa friend, and fellow blogger, Krystle is also a crochet genius. Her previous works of art include a baby bunny rattle, and little baby booties.  I was floored when I saw the intricate baby blanket that she crocheted for me with alternating squares of bears and flowers. (Read more about her creation here.) I love that I received two crocheted blankets that are so different and complementary.


And of course, dear friend Jenn also crafted me something for baby. She sewed me the cutest little baby bibs (so cute and chic that they are in fact "baby aprons").


Thanks to everyone for all your generosity (handmade or otherwise!) I only hope to be able to return the favour one day!

Read more...

Houses! baby comforter

When I first saw the machine paper foundation piecing class at the workroom, I was in awe. Karyn blogged about her beautiful houses that they learned to make in the class; she also shared this flickr link for other cool patterns using this technique. There are some tutorials online that teach you how to do machine paper foundation piecing, but I know how much better I learn from face-to-face instruction, especially from Johanna, Karyn's go-to quilting instructor for classes at the workroom.


I was SO pleased with the class. Johanna is all about smart shortcuts that make life easier. I even think her technique is more accurate. I couldn't imagine tackling The Hunger Games quilt using a different technique. I would have pulled out all my hair (even the extra luscious hair I'm currently sporting thanks to this pregnancy).

The class we took was for the "Houses!" pattern, a Johanna original. Houses and trees are perfect candidates for this machine paper foundation piecing technique. Lots of sharp, precise edges. Some patterns are just too curvy to showcase the precision of this technique (I thought the birds from The Hunger Games quilt were perfect candidates, too.)

I used mostly scraps for this project, and with Johanna's help, we designed it to be slightly bigger, suitable for a baby comforter with a high loft batting. I struggled to find some good quality wool or cotton batting and had to settle for polyester... I'm hoping I won't regret that decision, but worse case scenario, I'll undo the quilt and replace the batting. The quilt top is just too beautiful to be ruined by sub-par, man-made filling.


There are essentially four rows of houses and trees. I added an extra column of tree-fabric (Farmyard by Sentimental Studios) to widen the quilt top. The backing is an ultra-soft chocolate brown chenille, and the border is a beautiful postcard fabric (Curio by BasicGrey) with notes of brown, light-pink, grey, and cream.

At Dustin's request, we kept our nursery colour scheme simple. We agreed to a cream wall, white furniture, big brown leather chair, and some pink/cream/brown strewn about. The comforter fits well in the room. It won't be used for a while as baby will likely be swaddled for the first few months. But I'm working displaying it on the wall next to the crib. I also threw together a small quilted mat and matching cushion to give the room a little bit of accent.


My nephew has already made use of the super soft comforter when he and my sister came to visit in December. I'm excited for baby-Dunwell to be old enough to enjoy such craftsmanship!

Read more...

Yummy Yogurt

Today I am 37 weeks pregnant! Full term. and very large. I feel like I'm in the last leg of a marathon (not that I've run a marathon... perhaps it feels like the last 3 hours of our Garabaldi Mountain hike...)

During my pregnancy, I've been trying to eat lots of yogurt. It's supposed to be a great thing to eat when pregnant (calcium for growing bones, bacteria for digestion, the fact that it's not chips...)

I don't tend to get flavoured yogurt because I find it too sweet. If I buy the kind that is "fruit on the bottom" I'll purposely leave some of the fruit at the bottom. I also never buy the fat free stuff because it's thickened with corn starch... And that's weird to me. My preferred yogurt is just plain 2% yogurt.

My favourite way to eat it is with a spoonful of maple syrup, or a dollop of delicious jam.

For Christmas, my brother and his fiancée bought me an AMAZING local jam from Ottawa. The brand is michaelsdolce and they pride themselves on using local ingredients for maximum flavour. The lime and kiwi flavour I got was divine.


Besides eating yogurt as a healthy snack, I think it's fabulous in baking. Here are some of my favourite recipes:

1. Ina's Lemon Yogurt Cake. The last time I made it, I baked it into a layered cake with lemon curd filling and vanilla buttercream icing.


2. Janet and Greta's CopaBanana Cake. I make this recipe all the time, substituting the low fat sour cream for yogurt. Whenever I want to make up my own banana cake/muffin recipe (like when I made the red fife blueberry banana muffins), I always start with this recipe and adjust from there.


3. Most recently I made a carrot pound cake. I found a recipe that called for sour cream and then adjusted for yogurt. It's amazing how tic-tac orange the batter becomes. Quite bright and cheerful for a bitter cold January.


Carrot cakes always tend to be quite moist; this one is especially so because of the yogurt. The recipe makes two small loaves but I saved some of the batter to make some mini cupcakes, sprinkling them with cinnamon and sugar. Usually I will take cakes out of the oven as soon as an inserted skewer comes out clean. For this recipe, I would make sure the edges and top are a nice golden brown, which is several (maybe even 10 mins) after the skewer comes out clean. About 60 minutes total.

Enjoy!!!

Carrot Yogurt Pound Cake

1 cup butter, room temperature

2 cups sugar

6 eggs

1 cup yogurt

1 teaspoon vanilla

3 cups flour

½ teaspoon each baking powder, baking soda, and salt

3 cups shredded carrots


1. Preheat oven to 350 degrees farenheit.
2. Cream butter and sugar until light and fluffy.
3. Sift flour, baking powder, baking soda and salt and set aside.
4. Add eggs to butter sugar mixture one at a time, beating after each addition.
5. Add yogurt and vanilla. Mix until smooth.
6. With mixer on low, add flour mixture 1/3 at a time.
7. Add carrots and mix until just blended.
8. Fill two small loaf pans that have been lined with parchment paper.
9. Bake for 60 minutes or until skewer comes out clean and the top is a nice golden brown.

Read more...

Kensington sweethearts

Jenn was my Kengsington sweetheart yesterday as we perused Toronto's Kensington market in search of desserts and other baked goods to satisfy our sweet-tooth.


I never used to be big on sweets. I always preferred a bowl of chips over a double chocolate brownie with double churned French vanilla ice cream. But this pregnancy has definitely heightened my sugar cravings. I will actually pass on the calamari appetizer to try and save room for some dessert now.

Jenn and I created our own little tour of dessert stops in the Kensington Market, sneaking in a little savoury refreshment here and there.

It's amazing how quickly we filled up on baked goods.
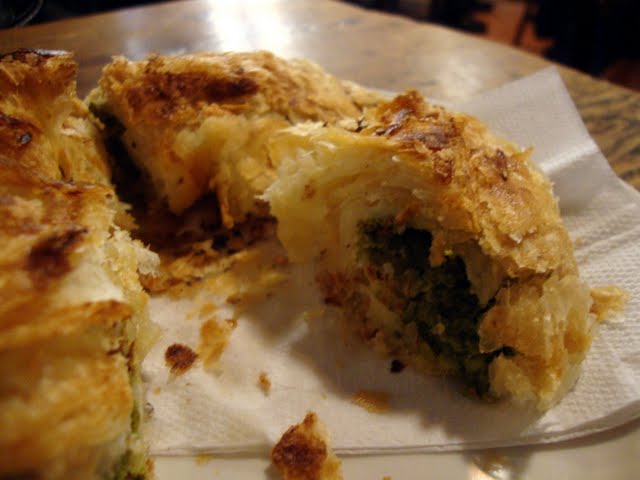
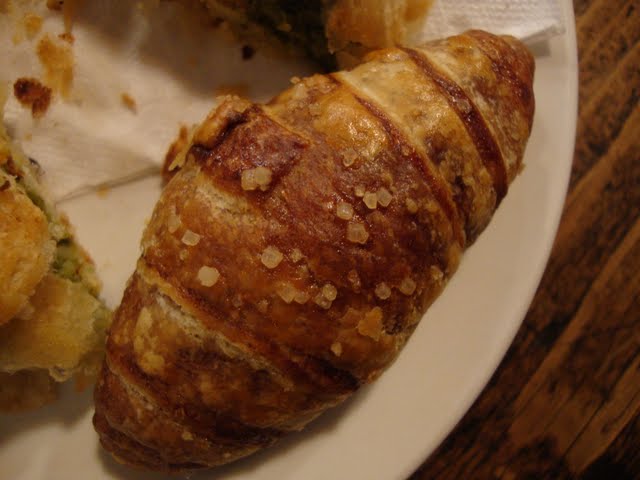
We started at the Moonbeam Coffee Company and started with a savoury light and flaky spinach and feta pastry called a boreka, coffee and mini chocolate croissant to finish.  All of their pastries looked divine, and there was that lovely homey Kensington Market feel that made me wish I lived nearby.

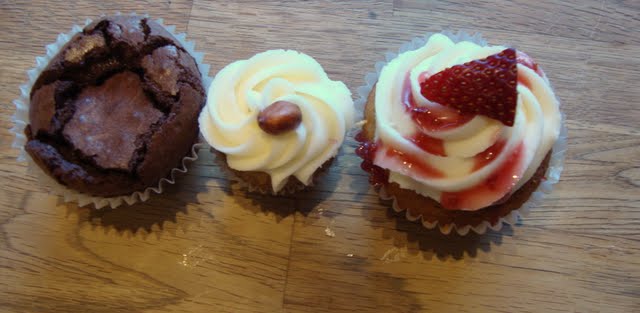
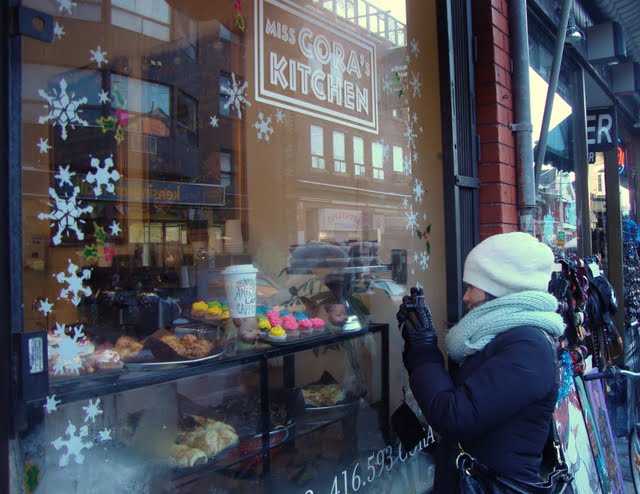
Our second stop was probably my favourite. Much smaller than Moonbeam Coffee Company, Miss Cora's Kitchen was filled with baked goods made from local market ingredients. There were options for any vegan, gluten-free, or all-the-works patron; we definitely had trouble narrowing down our choice selections for this leg of our sweets tour. Although Miss Cora was not present that day, Miss Carmel made some suggestions and we settled on a flourless chocolate cupcake, a vegan peanut butter cupcake, and my favourite: a jam-filled strawberry cupcake.  All fantastic.

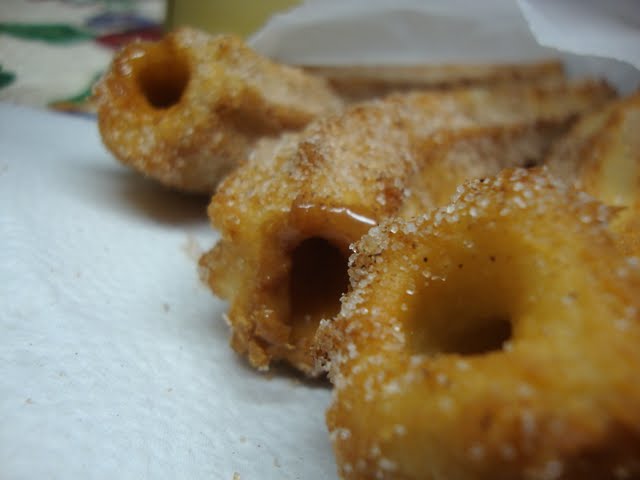
Stop number three was at Panchos Bakery where we, naturally, ordered churros and hot chocolate. The churros were a little heavier than expected, perhaps even a little bland although covered in sugar. I would recommend asking for extra caramel sauce.

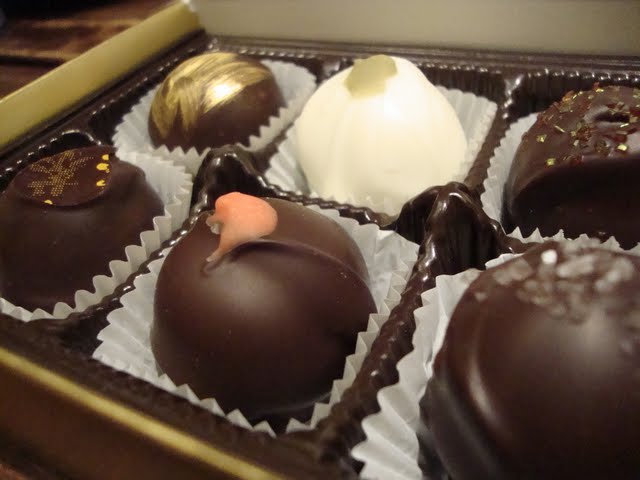
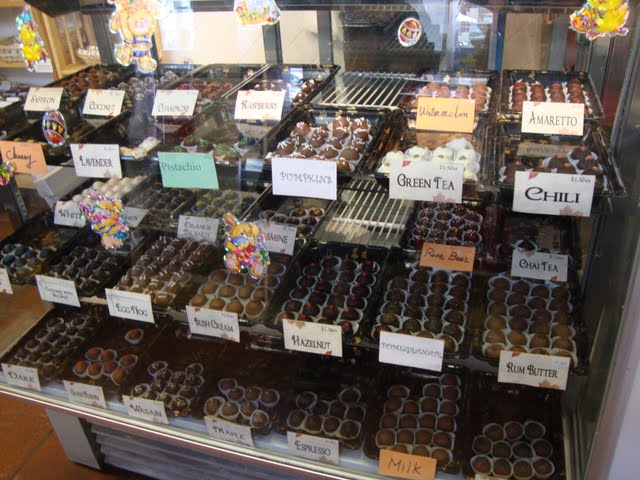
We made a quick stop at the Chocolate Addict and chose 6 truffles to bring with us to our last stop: Krepesz.  The Chocolate Addict is a tiny shop with a decent selection of truffle flavours. We settled on (clockwise from top left) jasmine, green tea, pomegranate, caramel sea salt, chili, and chai.  The chocolates were delicious, but I'm not sure if it was my tired palate or perhaps my under-appreciation for simple chocolate bonbons, I didn't think the chocolates were anything extraordinary.

Krepesz was our last stop.  The sit-down area was quite a bit more upscale than the average Kensington Market venue, so it was nice way to end the afternoon.  Krepesz is a Hungarian crepe shop; they also have on their menu a "chimney cake" that looked rather interesting. The afternoon of sweets (and the heavy churro) left us with little appetite, but we decided to share a savoury crepe filled with spinach, tomatoes and feta. A friend joined us and ordered a strawberry and nutella crepe. The crepe itself was delightfully light (thank goodness.)  I would definitely return and order one of the heavier dessert crepes next time (and save room for a chimney cake).

Our tour of sweet shops in Kensington Market was great. We knew there were official tours you could sign up to take with a group of people and an official guide, but doing it ourselves, and in a small party of 2, let us go at our own pace and not feel rushed (or too cramped.) I'm not sure if my sweet-tooth will remain after my pregnancy, so the timing for this sugary adventure was perfect.

I hope you've enjoyed the vicarious sweets tour of Kensington Market. Let me know if you have any Kensington Market sweet secrets you'd like to share!

Read more...

The Hunger Games quilt

I have been so excited to tell you about this quilt!!!

I had always planned to sew a quilt for Dustin. Something to keep him warm in the winter days when he works from home and braves the "away" temperature settings of our thermostat (what a eco-friendly guy.)  The difficulty? I am drawn to girly, whimsical fabrics and patterns. I just love the flowers, paisly, hearts, polka dots, pinks, violets, and hedgehogs: none of which are particularly Dustin's style.


In November, I finally took the machine foundation paper piecing class at the workroom. I enjoyed the class so much (and will tell you soon about the baby blanket that I made in the class!) that I scoured the internet for other paper piecing templates that I could make.

I stumbled upon these templates for The Hunger Games, one Mockingjay for each (fantastic) book, and I knew these were the perfect quilt blocks for Dustin. I stuck to solid coloured fabrics (all Kona solids), and let the birds be the star of the quilt, then chose a brick border and triangle backing.

I managed to finish the quilt-top by Christmas, gave it to Dustin, and then finished the quilt (backing, batting, binding and quilting) over the last couple weeks. I'm SO impressed with how the quilt turned out, especially since I decided to free-motion quilt all the layers together using swirling pattern of flames.

If you haven't read The Hunger Games yet, I definitely recommend the books. Yes, they are teen books, but it's definitely a mature storyline.

The final detail for Dustin's fantastic quilt: "May the odds be ever in your favour." Seriously. Go get the books and read them.


Read more...

Pillowcase Dress Tutorial

Happy New Year! And with the new year, I've decided to take care of some unfinished business. I had promised a Pillowcase Dress tutorial, and here it is! I finally finished it and am really excited to share it with you. Hopefully you'll be inspired to sew one of your own, maybe even get some friends together and have a sewing party!


This pillowcase dress tutorial was originally designed for the Little Dresses for Africa event that was hosted by Emily from Mothers, Daughters. This is a very basic tutorial for the beginner sewer!

You only really need buy two things: a pillowcase, and two yards of double fold bias tape!

click HERE for a pdf of the tutorial. Thank you wordpress for supporting pdf uploads.


THE PILLOWCASE DRESS TUTORIAL

Materials:
1 pillowcase 
2 yards double bias tape 
All-purpose thread 
Fabric Scissors 
Straight pins


Steps:


1. On the pillowcase, there will be a sewn end, and an open, hemmed, end. Cut off 2.5” at the sewn end. Reserve the scrap.


2. Measure the length of the pillowcase and make note of the size you are making: Small = 16”-22”, Medium = 24”-28”, Large = 30” - 34”


3. Fold the pillowcase in half lengthwise, lining up the long edges. Pin the armhole template (using the correct size) to your pillowcase, lining up the “fold line” with the long edges of the pillowcase. Cut. Unfold to have armholes cut on both sides.

4. Choose one side to be your “front”. Set your stitch length to the longest setting and sew across the “front” top edge using a ½” seam allowance. Sew another row 1/8” below that. Do not backstitch at either end.


5. Grab the two bottom threads and gently pull to gather the fabric. Adjust to the length you need: 6” for small, 7” for medium, 8” for large.

6. Press the ruffles with the iron so it’s flat and easier to work with.

7. Cut the 2.5” scrap into two equal lengths.

8. Pin the scrap to the wrong side of the ruffle edge, raw edges lining up.

9. Reset your stitch length. Stitch the scrap to the dress using a 1/2” seam allowance. Back stitch at each end. Trim the excess scrap fabric.


10. Flip the scrap piece to the front of the dress. Pin, ensuring you are covering any stitching from the ruffles.

11. Edgestitch the scrap to the dress.

12. Repeat on the top “back” edge.
13. Cut two 1 yard pieces of double fold bias tape. Optional: open the tape, and turn the ends under ¼” on each end; press or pin closed.
14. Open the bias tape and mark the ½ yard point on the bias tape with a pin. Pin to the armpit fold of the dress. Wrap the bias tape around the raw edge of the armhole and repin to hold in place.


15. Continue encasing the bias tape over the raw edge of your armhole. Ensure you’ve pinned through all layers: both sides of the bias tape as well as the pillowcase.


16. Stitch the entire length of the bias tape closed.


17. Repeat on the other armhole using the remaining 1 yard of bias tape.

18. Your pillowcase dress is complete! Feel free to add any embellishment to the dress!

Read more...

  © Blogger template Shush by Ourblogtemplates.com 2009

Back to TOP